I recently ran across an article about ‘15 Practical Grep Command Examples In Linux/Unix‘, and thought it would be cool to run through each of the examples, and give the PowerShell equivalent for each one.
This is not meant to be a grep vs Select-String (or Linux vs Windows), but look at it as an introduction to Select-String if you are familiar with grep already.
In PowerShell, the command used for string matching is of course Select-String, but since these examples are meant to be run in the console, I will be using the default alias ‘sls‘.
1. Search for the given string in a single file
In this example, the article shows how you would use Grep to search for a string in a single file.
$ grep "this" demo_file
this line is the 1st lower case line in this file.
Two lines above this line is empty.
And this is the last line.
This is how we do it in PowerShell:
sls this .\demo_file.txt -ca

As you see, Select-String defaults to showing you the name of the file and the line number where a match was found. Notice also that Grep matches using case sensitivity, and since Select-String is case insensitive by default, I have to use the -CaseSensitive parameter (abbreviated to -ca in the command).
If we want to get the exact same output as the Grep command in the first example, we could do the following:
sls this .\demo_file.txt -ca | select -exp line

Select-String actually returns an object, and the matching lines are found in a property called ‘Line’, so using Select-Object with the ExpandProperty parameter I can tell PowerShell to only show the contents of the ‘Line’ property.
2. Checking for the given string in multiple files.
In this example, the demo file is copied to another file (demo_file1.txt), and the same search for ‘this’ is done on both files.
$ grep "this" demo_*
demo_file:this line is the 1st lower case line in this file.
demo_file:Two lines above this line is empty.
demo_file:And this is the last line.
demo_file1:this line is the 1st lower case line in this file.
demo_file1:Two lines above this line is empty.
demo_file1:And this is the last line.
And in PowerShell:
sls this .\demo_* -ca

Again, we see the default output of showing the filename and the line number before the matching text. If we want to make it exactly like the grep command, this is one way of doing it:
sls this .\demo_* -ca | % {"$($_.filename):$($_.line)"}

This time it’s a bit more complicated, as I have to run the results through ForEach-Object and concatenate the Filename and Line properties.
3. Case insensitive search
Using grep you have to use the ‘-i’ parameter to perform case insensitive searches, while Select-String uses case insensitive matching by default. This is the grep example from the article:
$ grep -i "the" demo_file
THIS LINE IS THE 1ST UPPER CASE LINE IN THIS FILE.
this line is the 1st lower case line in this file.
This Line Has All Its First Character Of The Word With Upper Case.
And this is the last line.
And here it is using Select-String in PowerShell:
sls the .\demo_file.txt

As you see, it’s identical as the first example, with the exception of the ‘-CaseSensitive’ parameter. I’ll drop the exactly-like-grep command for this one, as it too would be just like in the first example, but without ‘-ca’.
4. Match regular expression in files
One of the most loved (and used) features of grep is the possibility to use regular expressions for string matching, and of course Select-String also supports this.
Using grep:
$ grep "lines.*empty" demo_file
Two lines above this line is empty.
And Select-String:
sls 'lines.*empty' .\demo_file.txt -ca
sls 'lines.*empty' .\demo_file.txt -ca | select -exp Line

It’s worth mentioning that Select-String uses regular expression by default. If you only want to match on string, you must use the -SimpleMatch parameter!
5. Checking for full words, not for sub-strings
In grep you can use the -w parameter to tell grep to search for full words and not sub-strings. The following two examples show how to search for ‘is’ in the demo file, with and without -w.
$ grep -i "is" demo_file
THIS LINE IS THE 1ST UPPER CASE LINE IN THIS FILE.
this line is the 1st lower case line in this file.
This Line Has All Its First Character Of The Word With Upper Case.
Two lines above this line is empty.
And this is the last line.
$ grep -iw "is" demo_file
THIS LINE IS THE 1ST UPPER CASE LINE IN THIS FILE.
this line is the 1st lower case line in this file.
Two lines above this line is empty.
And this is the last line.
We don’t have any parameters for this in Select-String though, so we need to use regular expressions instead. Luckily it’s quite simple.
sls is .\demo_file.txt
sls \bis .\demo_file.txt

In the second command example you see that I’m using the regular expression word boundary anchor (\b) to indicate that while I’m searching for ‘is’, it needs to be a separate word and not a sub-string.
6. Displaying lines before/after/around the match
In this example, yet another demo file is used:
4. Vim Word Navigation

You may want to do several navigation in relation to the words, such as:

 * e - go to the end of the current word.
 * E - go to the end of the current WORD.
 * b - go to the previous (before) word.
 * B - go to the previous (before) WORD.
 * w - go to the next word.
 * W - go to the next WORD.

WORD - WORD consists of a sequence of non-blank characters, separated with white space.
word - word consists of a sequence of letters, digits and underscores.

Example to show the difference between WORD and word

 * 192.168.1.1 - single WORD
 * 192.168.1.1 - seven words.
I have saved this file as demo_text.txt
6.1 Display N lines after match
This example prints the matched line, along with the 3 lines after:
$ grep -A 3 -i "example" demo_text
Example to show the difference between WORD and word

* 192.168.1.1 - single WORD
* 192.168.1.1 - seven words.
Here we are doing the same thing in PowerShell:
sls example .\demo_text.txt -Context 0,3

The Context parameter lets you capture the specified number of lines before and after the line with the match. 0,3 means 0 lines before, and 3 lines after.
6.2 Display N lines before match
Grep:
$ grep -B 2 "single WORD" demo_text
Example to show the difference between WORD and word

* 192.168.1.1 - single WORD
Select-String:
sls example .\demo_text.txt -Context 2,0

Again, we are using the Context parameter, this time to indicate that we want 2 lines before and 0 after.
6.3 – Display N lines around match
As you see, grep has separate parameters for these three functions (-A, -B and -C):
$ grep -C 2 "Example" demo_text
word - word consists of a sequence of letters, digits and underscores.

Example to show the difference between WORD and word

* 192.168.1.1 - single WORD
Select-String uses one parameter (-Context) to perform all three different scenarios:
sls example .\demo_text.txt -Context 2,2

Note the arrow pointing to the line containing the actual match.
7. Highlighting the search
Grep let’s you highlight the matches, like so:
$ export GREP_OPTIONS='--color=auto' GREP_COLOR='100;8'

$ grep this demo_file
this line is the 1st lower case line in this file.
Two lines above this line is empty.
And this is the last line.
This is something that Select-String won’t let you do. And the reason for that is quite simple. While grep is mostly a console tool, and return text, Select-String returns objects with raw data. The results can be shown on the screen, but it could also be piped to other functions, like Out-File if you want to save the results to a file. Highlighting the matches is only good for showing on the screen though. It is possible to do this, but you would have to create a custom function for it. Here is a function someone else made that seems to do this: http://weblogs.asp.net/whaggard/powershell-script-to-find-strings-and-highlight-them-in-the-output
8. Searching in all files recursively
Grep lets you search in all files under the current directory recursively, using the -r parameter:
$ grep -r "ramesh" *
Since Select-String is made to work with objects, you can simply pipe the results of Get-ChildItem (alias ls) into it and it will search through all the files it gets from the previous command:
ls * -r | sls 'ramesh'

Here I use the -Recursive parameter with the Get-ChildItem to recursively search for all files from the current folder. The results are piped to Select-String that searches for any occurrences of ‘ramesh’ in the files.
If case you are interested, I don’t have any files with ‘ramesh’ in them 🙂
9. Invert match
Using the parameter -v with grep, you can invert the matches. In this example all lines that do not include ‘go’ are returned:
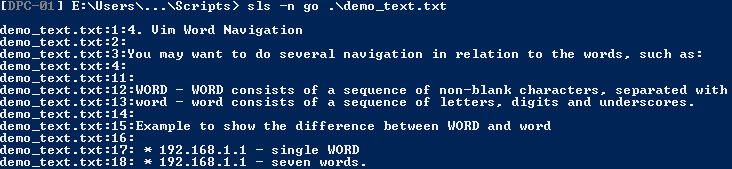
$ grep -v "go" demo_text
4. Vim Word Navigation

You may want to do several navigation in relation to the words, such as:

WORD - WORD consists of a sequence of non-blank characters, separated with white space.
word - word consists of a sequence of letters, digits and underscores.

Example to show the difference between WORD and word

* 192.168.1.1 - single WORD
* 192.168.1.1 - seven words.
Select-String have a -NotMatch (shortened to -n in this example) parameter that let’s you do the same:
sls -n go .\demo_text.txt
10. Display lines which does not match all the given patterns
Here we are using a new test file again. Here are the example using grep:
$ cat test-file.txt
a
b
c
d

$ grep -v -e "a" -e "b" -e "c" test-file.txt
d
Select-String:
sls -n a,b,c .\test-file.txt

Since Select-String works with objects, it accepts both a string as well as an array of strings, as this example shows.
11. Counting the number of matches
$ grep -c this demo_file
3
While Select-String don’t have a parameter that returns only the count of the matches, the returned object do have a count method:
(sls this .\demo-file.txt -ca).count

Note that this only counts the returned lines. If you want to count the returned matches you would use .Matches.count. In this example, the result are exactly the same though.
12. Display only the file names which matches the given pattern
$ grep -l this demo_*
demo_file
demo_file1
Here, the -l parameter is used with grep to indicate that you just want the file names returned.
sls this .\demo_* | select -u -exp filename

Since Select-String returns objects (the returned object is of type MatchInfo), the filename information is already present. We just have to use Select-Object to tell PowerShell that we want it. In this case, we are using -Unique since we just need the different file names displayed once, and -ExpandProperty so that we don’t get the property header.
13. Show only the matched string
By default grep will show the line which matches the given pattern/string, but by using the -o parameter you can tell grep to show only the matched string of the pattern:
$ grep -o "is.*line" demo_file
is line is the 1st lower case line
is line
is is the last line
Select-String:
(sls is.*line .\demo_file.txt -ca).matches | select -exp value

Here we are running the usual Select-String command, then we are utilizing the returned object to get the value of the matches instead of the whole line. The returned object have a Matches property that contains all the matches from the command. All of the matches have a value property that contains the value of the match.
14. Show the position of the match in the line
Grep have the parameter -b that shows the position where it matches the pattern in the file. In this example it’s used together with the -o parameter we looked at in the last example, as well as a new test-file.
$ cat temp-file.txt
12345
12345

$ grep -o -b "3" temp-file.txt
2:3
8:3
Since grep treats text as “just” text, what you see above is the index of the match as grep reads the whole text in one chunk. Select-String treats text as most commands in PowerShell do, as an array of chars, and it also processes one line at the time. Because of this, we have to be a little clever to re-create this example in PowerShell:
(gc .\temp-file.txt -ReadCount 0 | sls 3 -all).matches | % {"$($._index):$($_.value)"}

I admit this looks a bit nasty compared to the grep equivalent, but it’s all due to the differences of the two commands (as described above). Let’s see what I had to do to get the same results as grep. First I use Get-Content (alias gc) with a read-count of 0, which tells PowerShell to send all lines through the pipeline at the same time. Select-String is then run on what it got through the pipeline and performs the matching. We then utilize the matches property of the returned object, use ForEach-Object to iterate through the matches and concatenate our string using the Index and Value properties of the MatchInfo object.
15. Show line numbers while displaying the output
To show line numbers with grep, you use the -n parameter, like so:
$ grep -n "go" demo_text
5: * e - go to the end of the current word.
6: * E - go to the end of the current WORD.
7: * b - go to the previous (before) word.
8: * B - go to the previous (before) WORD.
9: * w - go to the next word.
10: * W - go to the next WORD.
As you have seen already, Select-String shows the line numbers (as well as the file name) by default, but the following command can be used if you want to only show the line numbers and the matching line:
sls go .\demo_text.txt | % {"$($_.linenumber):$($_.line)"}

Note that some of the examples I have shown in PowerShell are not the best way of using Select-String (for example the above example), but I included it to show that it’s possible to mimic the output you get from grep.
It’s important to take advantage of the fact that you are working with objects when doing stuff in PowerShell, since you never know when you might want to do something besides show the results to the screen, like output to another command for further processing, or saving it to a file. To illustrate the point I’m going to re-do the above example the “PowerShell way”.
sls go .\demo_text.txt | select linenumber,line
sls go .\demo_text.txt | select linenumber,line | ft -a

The first command runs Select-String, then I pipe the results to Select-Object because I only want to select the LineNumber and Line properties. As you see from the next command, since I still have an object, I can further pipe it into Format-Table to format it for the screen. Note that using any of the Format-* commands will “break” the object, so only use these when working in the console, or when you are absolutely certain that you only want to output to the host.
Also note that Select-String have a parameter called -AllMatches which means that the command will search for more than one match in each line of text. By not using this, only the first match in each line will be captured. I have not used this parameter in any of these examples, as these were pretty basic. But it’s important to know about this one, and that, by not using it, you will only get the first match of each line. Keeping this in mind might save you some troubleshooting!
That concludes this demonstration of Select-String, and a comparison with the Linux/Unix grep command. Hope you like it! As with anything PowerShell, there is a lot of different ways of achieving what you want, so I know that some of the examples could have been done several different ways!

Really good stuff! I’ve done something similar here:
http://mattypenny.net/powershell/equivalent-of-unix/
and
http://mattypenny.net/powershell/perl-one-liners-emulated/
….although not as elegantly as you!
LikeLike
Thanks.. and wow! Some very nice stuff in your blog posts! Thanks for sharing 🙂
LikeLike
This is great, but it would be nice to be able to copy and paste the commands as well.
LikeLike
Thanks. I have added the copy-able commands above each screenshot now.
LikeLike
Great post, very helpful. I needed to generate a list of the names of only the first file (alphabetically) in each directory recursively. My thought process was: “I know, I’ll use grep! Oh, but I have to do this in Windows… I know, I’ll search for a way to simulate grep in PowerShell. Hmmm, now I have three problems.” Anyhow, after reading this and a lot of trial and error I got it to work. Thanks!
LikeLike
Thank you for your kind words. It’s always nice when someone are able to solve real-world problems after reading a blog post I wrote! That’s a huge part of why I do this. I have been in your situation so many times myself, so it feels nice to be able to give something back 🙂
LikeLike
Nice blog, this is was a beauty post.
LikeLike
Thank you. I’m glad you liked it!
LikeLike
this is great sls turns to be my favorite PS command but unfortunately there are still number of limitations:
– display file name by default (could workaround with select)
– using context (select line doesn’t show you the context )
and this lot of useless typing…
LikeLike
Nice write up and well presented, I appreciate it. Linking.
LikeLike
Thanks! I’m glad you like it 🙂
LikeLike
Thanks for your excellent post! Many of the others I came across didn’t bother to use aliases to demonstrate how concisely sls could be used to simulate grep. I hadn’t put together that ls * -r was the same as get-childitem * -rec which was causing me to hate using it. I’ve also run into a weird issue where you get a permissions error if you just try to use -Path to sls even though its supposed to be recursive, and using get-childitem or ls -r works around this quite nicely.
To address the confusion about why you would want to have the filename:line# printed out. This is because many excellent text editors support opening a file to a specific line number and it is a fantastic way to jump around in a large project if you are looking for all instances of a certain variable or text value.
For example I use vim’s plugin file-line to do this and it saves a lot of typing and tabbing. https://github.com/bogado/file-line
LikeLike
Thanks for this excellent guide. One thing I was looking for which seems to be missing is handling of exit codes. grep will return 0 for successful matches and non-zero when there is no match. This is useful for scripting. I haven’t yet figured out how to do this with powershell. I see there are both $? and $LastExitCode vars, but they always return True/0 regardless of whether sls matches or not.
LikeLike
Nice! thanks
LikeLike